I often get asked about choosing a new bike. Unsurprisingly, there is no set answer to suit everyone and it depends on the particular circumstances of the customer and the intended use. But I thought it might be useful to write about some of the common things that get discussed for future reference.
Thursday, 3 October 2013
Wednesday, 25 September 2013
Stage 2 of the Tour de France 2014 - Part 1
The route of this stage leaves York, skirts the bottom edge of the Dales before turning South through the South Pennines and Peak District to Sheffield. Like before, I wanted to look at the key parts of the stage where the action might happen on the day.
Saturday, 31 August 2013
Setting new cleats
I've had the same brand and model of road shoes for over six years now (not the same pair though!), so it's been a long time since I've had to set the cleat position on a different make. And with some new shoes, I've been struggling to find a comfortable position for the cleats. So after several abortive test rides, it was time to be a little more scientific.
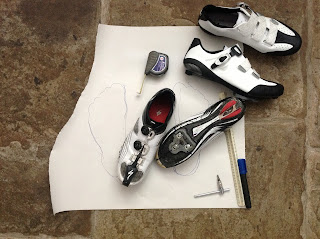
Looking at my old shoes, I found the angle between the cleats and the centre line of my feet was quite different on the left and right shoe. I guess it happened over time, and I simply copied the position from one set of shoes to the next. I've never ridden fixed cleats though, so my feet have probably being able to find their natural position.
On the new shoes, I've aligned the cleat angle on both shoes parallel to the centre-line of my feet. I wondered where the centre actually was though, so I stood on a piece of paper in a 'natural' position with feet under hips and traced the outline of my feet. I've then imagined two parallel lines over the tracings, roughly perpendicular to my hips, and set the line of the new cleats to match. The line is similar to the old right cleat.
Forward and back adjustment is set to match my old cleats, which for me is the first joint of of the big toe about 10mm forward of the pedal axle. (This seems to work for me, though there are lots of different opinions.) I did this taking lots of measurements between the cleat and the the toe and heel on the new and old shoes, and also by marking the position of the big toe joint on the shoe. As many measurements as possible seems best. Side-to-side adjustment is also to match the old shoes as closely as possible.
So, we'll see how the new shoes feel with this position. First impression is much better, but a long ride is needed to really tell. I might take the old ones with me just in case!
Saturday, 24 August 2013
Stage 1 of the Tour de France 2014
Yesterday, I went to ride part of the first stage of next year's Tour. It's easier to do this than ride the whole stage - it means you can make a loop and start and finish at the same spot. You can pick the good bits too and avoid the inevitable sections of busy main roads that the race uses to link places together. I don't try to follow the exact route either. So, if there is a choice between a quiet country lane and a busier main road for the Tour, and they both go to the same place, then I will choose the quite lane every time.
So, I set off yesterday morning from Grassington with a good friend. The planned ride was to follow the Tour route over Kidstones to Aysgarth, then Butter Tubs, before making our way back from Muker via Hawes and Fleet Moss. So the route was ideal to look at the key climbs of Kidstones and Butter Tubs.

After a good 15km warm-up in Wharfedale on the minor road through Coniston (not the official route but a much nicer road to ride), the climbing starts at Buckstones with the ascent of Kidstones.
Now this is the first time I'd climbed Kidstones. It is a steady grade to start which meant a fast tempo for us helped by the tail wind. And by drafting a tractor and heavily laden trailer! A flatter section towards the pub at Cray - where we were distanced by the now faster moving tractor (I'd like to think we could have kept up if we wanted, but it was early in the ride to be going hard) - gives some respite before the steeper top section. It never feels that steep though, I think because of the hairpins and the interesting geology to look at - if you like that sort of thing. The steepest section is very short, and will be a sprint for the pros. Even we managed to sprint to the top, catching up and then overtaking the tractor!
The descent through Bishopdale to Aysgarth is fantastic and quick. Amazing scenery and a super fast twisty road. This is all going to add up to some fantastic helicopter shots next year, especially if the weather is good and the roads are dry. Once in Aysgarth, after cutting the corner after Grange Farm, the minor road through Askrigg is the better option. The next 15km or so shows off Wensleydale at it's best. Limestone drystone walls and barns in every field. It is a good chance to recover too before the second major climb of the day.

Butter Tubs is a well known climb in these parts. From Askrigg, it starts with a steep right turn, a shock to the legs after the tempo of the valley road. But the steep section is only short with the gradient easing at the first corner as you enter the wood, and this pattern sets the tempo for the climb. The road sign warns of grades up to 17%, which seems about right, but height is gained in three relatively short steps and the pros will sprint up these. If anyone is gapped, there are chances to re-group. Watch out for the cattle grid on the final steep section. Although challenging to keep momentum going over the grid, it marks the end of the steep grades and the start of the false flat to the summit. Big ring gears all the way if you're feeling strong!
Butter Tubs is the high point of the day at 526m. So it beats Holme Moss, my local big climb and the high spot of Stage 2, by a mere 2m!

The descent to Swaledale is going to be interesting. Grades of 25%, bends and narrow roads is going to make the racing exciting to say the least. At least the road will be swept for loose gravel, or at least I assume it will be, so the pros won't have to contend with this as well. It is going to be a sight to see large bunches descending these roads at speed. And making that sharp right turn at the bottom!

After Muker, we left the Tour route and headed back to Askrigg over Askrigg Common. This was a new road for me, and far and away the best of the day. So, go and ride this one if nothing else. After this, it was Fleet Moss into a stiff headwind. This was just payback for the helping hand earlier in the day. At least it was either steeply up or downhill most of the way back to Grassington!

Having ridden the Tour hills of Stage 1, I can't see them ruling out a sprint finish to this stage. Kidstones is neither long nor particularly steep and is on good tarmac and wide roads. I think I can see now why this road was chosen ahead of Fleet Moss, which could have been much more influential on the stage finish. Butter Tubs is a more severe test for most, but the steep sections are short for the pros and there should be the chance to regroup on the climb or the false flat to the top, or failing that on the flatter valley roads afterwards.
A break could and probably will go early in the stage given the nature of the route and the road conditions. They will have an advantage, probably as far as Swaledale, but once on the wider and flatter roads of the last 50km or so, odds are they will be reeled in. And I can see the sprinters being there in the bunch. So would anyone bet against Cavendish coming first in Harrogate, his mother's home town? Here's hoping for a GB yellow jersey in the Tour in Yorkshire.
Next: Stage 2 through the South Pennines.
Wednesday, 21 August 2013
Fixed Gears: Raleigh Dakota
Fixed Gears: Raleigh Dakota: This bicycle belongs to one of my wife's best friends. It used to be her brother's bicycle - I guess early to mid 1990s with Biopa...
Raleigh Dakota
This bicycle belongs to one of my wife's best friends.
It used to be her brother's bicycle - I guess early to mid 1990s with Biopace type chainrings, thumb shifters and splatter paint. It is in pretty good condition too for its age - the paint is very good. It just needs some care now - new cables plus adjustments to the gears, brakes and bearings. And fit some easier tyres as it is mostly used on the road now.


It used to be her brother's bicycle - I guess early to mid 1990s with Biopace type chainrings, thumb shifters and splatter paint. It is in pretty good condition too for its age - the paint is very good. It just needs some care now - new cables plus adjustments to the gears, brakes and bearings. And fit some easier tyres as it is mostly used on the road now.

And the finished article. I've left the cables until later as a barrel adjuster is missing from one of the thumb shifters and I'll need to source a replacement. Until then only six of the seven sprockets work. I'd forgotten how fiddly cantilever brake adjustment can be, and noisy too without any toeing of the pads! Fixed now, just a bike fit to do.

Refurbished workshop
I've finished refurbishing my basement workshop. I've added tool boards and lots of hooks for hanging wheels, frames and other stuff. Everyone should have one! (Stone table optional.)
 .
.

Repaired Trek Madone
About six weeks ago, I found a crack in the drive side dropout of my 2005 Trek Madone. Now this frame has been repaired a couple of times to fix cable stops that had become detached from the frame. But this looked a lot more serious.

So, chapeau to Trek. They have removed the cracked drop out and inserted a brand new one into the carbon chain stay and seat stay. I don't know how you do that without damaging the carbon tubes. And all this was free of charge - including postage - under the lifetime warranty. Despite obvious signs of heavy use. No quibbles. Chapeau again!

So, chapeau to Trek. They have removed the cracked drop out and inserted a brand new one into the carbon chain stay and seat stay. I don't know how you do that without damaging the carbon tubes. And all this was free of charge - including postage - under the lifetime warranty. Despite obvious signs of heavy use. No quibbles. Chapeau again!
Wednesday, 31 July 2013
John's Claud Butler - part 3

John's Claud Butler is finished. I had to wait a few days for a new front brake cable hanger to be delivered, but now all the work is done and this morning it passed a test ride. It's a few years since it has been ridden, so it's a nice feeling to get it working again.


This road is like...#1
The idea for this post started on Facebook with a discussion of UK climbs that might remind you of Mont Ventoux.
OK, so you need to add a good dose of imagination!


Great Dun Fell was the first suggestion, but I usually think of Castle Hill near Huddersfield as a contender. Obviously, the length and height gained are nowhere close to Mont Ventoux, but the silhouette of the castle on the top of the hill reminds me (slightly) of the observatory on the summit.


For me, the similarities don't end there. Castle Hill can often be spotted in views, although it doesn't dominate the skyline like Mont Ventoux. But you also see the summit and the castle as you can climb through the trees and farm houses on Lumb Lane, like you do as you ascend the mountain in Provence.

For the statisticians, Castle Hill via Arkenley Lane and Lumb Lane is about 2.8km long compared to 21.5km up Mont Ventoux from Bedoin, and the ascent is 150m compared to over 1500m. So the length and height gained is 10 times less, but the maximum gradient is trumped with ramps on Castle Hill up to 25%, and surely steeper if you take the inside of the final hairpin. And the view? Well, I think it's special.
Next: Muur van Geraardsbergen (Belgium)
OK, so you need to add a good dose of imagination!


Great Dun Fell was the first suggestion, but I usually think of Castle Hill near Huddersfield as a contender. Obviously, the length and height gained are nowhere close to Mont Ventoux, but the silhouette of the castle on the top of the hill reminds me (slightly) of the observatory on the summit.


For me, the similarities don't end there. Castle Hill can often be spotted in views, although it doesn't dominate the skyline like Mont Ventoux. But you also see the summit and the castle as you can climb through the trees and farm houses on Lumb Lane, like you do as you ascend the mountain in Provence.

Next: Muur van Geraardsbergen (Belgium)
Thursday, 25 July 2013
John's Claud Butler - part 2
I noticed this Reynolds stamp on the fork steerer. No labels on the frame though.


John's Claud Butler
This is John's Claud Butler. I'm trying to get it back on the road again because John's had this bike for a long time and it has sentimental value.

John stopped riding after it developed an alarming wobble. The cause - a loose headset. After taking it apart, it was clear the bearings had failed. The cups are not good either, so for starters a new headset will be needed.

I'll also work on the drivetrain. A new chain, good clean and new cabling may be enough, but the cassette looks worn too. New brake pads and cabling also.


The hubs are grinding so they need stripping and re-building, possibly with new bearings. The tyres have perished and will need replacing.
I'll see what can be done in the next couple of weeks.

John stopped riding after it developed an alarming wobble. The cause - a loose headset. After taking it apart, it was clear the bearings had failed. The cups are not good either, so for starters a new headset will be needed.


The hubs are grinding so they need stripping and re-building, possibly with new bearings. The tyres have perished and will need replacing.

I'll see what can be done in the next couple of weeks.
Tuesday, 23 July 2013
Looking after your chain and drivetrain
There are
more moving parts in the chain than any other part of your bike. Looking after your chain and the drive train
will prolong their life, as well as making your cycling easier!
How
often should it be cleaned?
This
depends on how often you ride, how long you ride for, the weather you ride in and
the season
In dry
summer weather, you should be able to leave your chain alone for at least a few
rides and then only wipe with a rag and lightly re-lube.
In bad
winter weather, it is essential to fully clean your chain and drive train every
ride, especially if the roads have been recently salted. (In fact, cleaning the whole bike is a good
idea.)
Never put
your bike away wet. As a minimum, remove
water and dirt from the chain and drive train first, even if all you have the
energy to do is a thorough wipe down with lube sprayed into a rag.
In between dry
summer and bad winter weather, there is a middle ground comprising a full clean
and re-lube every few rides and a wipe down with a rag, and maybe a light lube,
after other rides.
How to
clean your chain and drive train
(This describes a deep clean. You can miss some of stages if the chain is not that dirty, but always with the aim of getting the chain, chainrings and cassette clean of all old lube, dirt and water before applying new lube. When finished, the chain, as well as the cassette and chain rings can be shiny, almost as new.)
Stage 1
Brush clean the derailleur pulleys. It may be a good idea to scrape between the cogs with a screwdriver if dirt has built up between the cage and pulley wheels.


Scrape clean the rear cassette with a brush, or again using a small screwdriver. Also between the chain rings where dirt builds up around the chain ring bolts.

De-grease the chain with a chain cleaning tool if you have one. If not, use a rag and brushes with degreaser / soapy water.

Wash the bike now with soapy water, and rinse. Do this to rinse off the degreaser otherwise it may break down the new lube. Also, the bike will get very dirty when degreasing a dirty chain.
Stage 5
Bounce the bike on the ground to shake off water and then dry the chain with a rag. Use WD40 or GT85 to disperse any remaining water from the links by spraying into a rag and running the chain through. (Doing it this way also protects the rim braking surface from the spray.) Dry the chain again to remove excess WD40.

Clean and dry the chainrings and the cassette with a rag. A spray with WD40 or GT85 can help. Use a brush, pipe cleaners or rag to get between the cogs.

Take care not to over-lube as an excess of oil will only attract dirt, as well as flicking oil over the bike frame and your legs. Aim for a drop on each individual roller and do this in turn until each link has been lubricated. A bottle with a dropper rather than a spray is best. Note that it is only the chain that needs lubing, not the cassette or chain rings. See below for a summary of different types of lubes.

Wait somewhere between 30 minutes and an hour for the lube to sink into the chain, and then wipe off the excess by running the chain again through a rag while slowly spinning the pedals.
Lubes, cleaning products and other equipment
There are different types of lube and cleaning products:
There are different types of lube and cleaning products:
- Water disperser (such as WD40) – not very useful as a bike lube as they are too thin and get easily washed off the drive train. Use to disperse water from the chain and drive train (protecting braking surfaces with a rag).
- Spray Teflon based lubes (such as GT85) – useful for getting into difficult to access spaces and pivots. Probably too light for regular chain use, but can be used to disperse water.
- Dry lubes – These lubes shed themselves as they attract dirt. Need to be applied more frequently as a consequence. My personal preference all year round.
- Wet lubes – thicker and longer lasting, and will resist being washed off. However, not so good in sandy or dusty conditions, as they are thicker and attract dirt. Not the best in dry conditions.
- Standard or all condition lubes – Not as heavy as a wet lube, nor needing to be applied as often as a dry lube.
- Degreaser – biodegradable solvent to break up old oil and grease allowing it be brushed / washed off the chain and drive train.

- Brushes – special brushes can be used to get between the cogs of the cassette. Washing up brushes and toothbrush will also do the job.
- Pipe cleaners - special pipes cleaners to get between the cogs and around the chainrings.
- Chain cleaner – a plastic box, filled with degreaser, and containing rolling brushes that clean the chain as it is passed through the cleaner.
Other hints and tips:
A “Master-link” in the chain allows the chain to be more easily removed if a particularly deep clean is needed.
A “Master-link” in the chain allows the chain to be more easily removed if a particularly deep clean is needed.
Every so often, removing a cassette from the wheel is a good idea as these can be difficult to fully clean otherwise.
How
often should the drive train be replaced?
Replacing worn chains will prolong the life of the cassette and chainrings. Depending on the type of riding you do, this could be as low as every 1500km or so, but perhaps two or three times as long if well maintained. A simple tool can be used to detect chain wear and show when it needs to be changed. Changing the chain before it is worn means a new cassette is needed less frequently (perhaps every third new chain), and new chainrings less so again.
New training bike - update
With the good weather we've had since I finished the new bike, I guess I've now done a couple of 1000km to check out the ride. And I have to say it is surprisingly good!
OK, so you notice the little bit of extra weight on the steeper hills compared to carbon, but it is a comfortable ride on typical UK tarmac and it descends as if on rails, at least as good as frames costing 6-times the price.
It just goes to show that there is a lot more to choosing the right bike and having good rides than paying for the latest materials or minimum weight.
New training bike
New aluminium frame from Racescene in Barnsley. Built with components I already had in the house, but including a new chainset, my first ever compact. We'll see how this feels on my local hills...


Subscribe to:
Comments (Atom)